by admin | Dec 4, 2017 | Blog
Exhibition: Achterhoek in 3D!
 Almost a year ago, an enthusiastic group of volunteers started an ambitious project: printing the Achterhoek in 3D. After a public voting phase, nine landmarks were chosen for production. The 3D print group used SOLIDWORKS to draw the buildings, after which they were printed with a dddrop 3D printer. Meanwhile, the project is finished and the prints of the buildings are shown in the Stadsmuseum in Doetinchem.
 The process
“We underestimated the drawing work” project employee Eefje Ernst says. “It was quite a lot of work, because the drawings need to be solid to print them properly. Because of this, the work got a bit delayed.” Luckily, the printing went successfully: “the process went through different phases. For example with the stone quarry of Winterswijk, we had difficulty creating real depth. We experimented until we had a beautiful stone quarry. About which print is Eefje the most satisfied? “I think about Ruimzicht, but that is purely because it contains a second layer. The balcony of Ruimzicht is placed separately, which creates more depth,” she says. It is great that you can print separate parts and later secure them on to each other. That makes it even more realistic.
The exhibition
 In the meantime, the buildings are finished and shown in the Stadsmuseum. The prints are placed on a big map of the region and photos of the original building are displayed. Besides that, a dddrop 3D printer is printing miniatures on site. There are also videos to be seen that explain the process. This makes the exhibition fun for everyone, young and old. Eefje: “The feedback is very positive. Visitors are enthusiastic about the set-up which gives the exposition
a body. The funny thing is that people picked up the buildings during the opening. I found that fascinating, because it is a museum after all. People just like to feel the buildings and see them from up close.
What’s next?
The exhibition is the last phase of the project: exhibiting the prints. Later on, the prints will be shown in the city centre, so that everyone can see them in a low threshold manner. “It is not clear how we will set this up yet,” Eefje explains. “But this is not the end of the project, the buildings will be shown outside.” Further on, the 3D print group will remain active. Every Tuesday evening, this group comes together and everyone is welcome to join. Eefje: “There is a possibility that other prints will be made for this project. Besides that, there is now time to print and experiment with other things again. Which the members of the group are very excited about!”

by admin | Nov 24, 2017 | Blog
Printing metal parts

At dddrop we continue to develop. So we are also exploring the possibilities for metal printing. The dddrop EVO Twin allows you to print full Stainless Steel parts at very competitive prices. dddrop developed parts, like special nozzles, to durable print the metal parts. Parts are 3D printed with a special metal filament: BASF Ultrafuse 316LX. After the 3D printing stage, the de-binding and sintering process is almost equal to the MIM (Metal Injection Moulding) pocess. The end result is a true and high quality Stainless Steel 316L part.
Are you interested in metal printing? Please let us know, we would like to explain all possibilities:
Contact us
by admin | Aug 25, 2017 | Blog
3D printing is a remarkable technology that brings ideas to life, layer by layer, creating objects right before our eyes. However, like any technology, it comes with its challenges. One such challenge that many enthusiasts and professionals encounter is 3D printing clogging. This issue can halt production, leading to wasted time, resources, and, of course, the frustration of having to troubleshoot and fix the problem. In this guide, we delve into the common causes of 3D printing clogging, how to prevent it, and what to do if your printer nozzle becomes clogged. Join us on this journey to ensure a smoother 3D printing experience.
Common Causes of Clogging
Understanding what leads to 3D printing clogging is the first step towards finding a lasting solution. Here are some prevalent causes:
- Filament Quality: Low-quality or contaminated filament can introduce foreign particles into the nozzle, causing clogs.
- Nozzle Alignment: Misaligned nozzles can scrape against the print, accumulating material that eventually leads to clogging.
- Temperature Settings: Inadequate temperature settings can either cause the filament to burn and stick to the nozzle or not melt sufficiently to flow smoothly.
In the next section, we will explore preventive measures to keep your 3D printing operations running clog-free.
Preventing Clogs
Prevention is better than cure, especially in the realm of 3D printing. Here are some proactive steps to combat 3D printing clogging:
- Regular Maintenance: Regular cleaning and inspection of your nozzle will help catch potential issues before they escalate.
- Choose the Right Filament: Opt for high-quality, contaminant-free filaments that are suited for your printer’s specifications.
- Proper Settings: Ensure your printer’s temperature and speed settings are optimized for the material you are using to prevent overheating or underheating, which could lead to clogs.
Unclogging Your 3D Printer
At some point, you might encounter 3D printing clogging despite your preventive measures. When this occurs, it’s crucial to address the clog efficiently to resume your printing projects. Here’s a step-by-step guide to unclogging your 3D printer:
- Identify the Clog: Determine the extent and location of the clog.
- Heat the Nozzle: Warm up the nozzle to loosen the clogged material.
- Manual Cleaning: Use a cleaning filament or a fine needle to remove the clog gently.
- Cold Pull Technique: Employ the cold pull technique to eliminate any residue.
- Check and Realign: After unclogging, check the alignment and ensure that the filament path is clear before resuming printing.
By following these steps, you can resolve 3D printing clogging and get back to bringing your creations to life.
Understanding the Cold Pull Technique
The Cold Pull Technique is a proven method to clear away residue from your nozzle’s interior. Initially, heat the nozzle to a temperature suitable for your filament type, then cool it down slightly below its normal printing temperature. Insert the filament and allow it to cool further. Once cooled, pull the filament out with a swift, steady motion. The idea is that the filament adheres to any residue within the nozzle, and pulls it out when removed. This technique is highly effective in preventing and resolving 3D printing clogging, ensuring a clean nozzle for a smooth printing experience.
The Right Tools for the Job
Having the right tools at your disposal can significantly ease the process of maintaining a clog-free 3D printer. Here are some recommended tools and accessories:
- Cleaning Filaments: Special filaments designed to clean the nozzle from the inside.
- Nozzle Needles: Fine needles can help dislodge clogs from the nozzle.
- Nozzle Brushes: These can be used to clean the exterior of the nozzle.
- Quality Filament: Invest in high-quality filament to reduce the chances of 3D printing clogging.
- Temperature Gun: A handy tool to ensure your printer reaches the correct temperature.
Equipped with these tools, you’ll be better prepared to prevent and address clogging issues, promoting a seamless 3D printing experience.
Material-Specific Guidelines
Different materials have distinct characteristics that can affect how they flow through the nozzle, potentially leading to 3D printing clogging. Here are some guidelines:
- PLA: Ensure proper cooling as PLA can become sticky when overheated.
- ABS: Maintain a consistent high temperature to prevent the material from hardening and clogging the nozzle.
- PETG: Clean the nozzle regularly as PETG can leave residues that harden over time.
- TPU: Print at a slower speed to prevent this flexible material from jamming.
Adhering to material-specific guidelines can significantly reduce the likelihood of encountering clogs while working with various filaments.
Conclusion
Navigating through the realm of 3D printing comes with its fair share of challenges, with clogging being a notable one. However, with a keen understanding of common clogging causes, preventive measures, and effective unclogging techniques, you can significantly minimize downtime caused by 3D printing clogging. Equipped with the right tools and knowledge, you’re now ready to tackle any clogging issues head-on and enjoy a smoother, more productive 3D printing experience. Remember, regular maintenance and adherence to material-specific guidelines are your allies in maintaining a clog-free printing journey.
FAQ
Why does my 3D print keep clogging?
Your 3D print may keep clogging due to impurities in the filament, misalignment of the nozzle, or inadequate cleaning practices. These factors may obstruct the filament’s smooth passage, leading to consistent clogs.
What to do if your 3D printer is clogged?
If your 3D printer is clogged, disassemble and clean the nozzle thoroughly using a cleaning filament or solvent. You can also heat the nozzle to remove any residual filament.
How do I stop my nozzle from clogging?
To prevent your nozzle from clogging, ensure you use high-quality, clean filament and maintain proper alignment of the printer parts. Regular cleaning and periodic maintenance checks can also help in preventing clogs.
Why does my extruder keep clogging mid print?
Your extruder may clog mid-print due to temperature fluctuations, incorrect printer settings, or the use of incompatible filament material. It’s essential to monitor the printing process and adjust settings accordingly.
How often should you clean 3D printer nozzle?
It’s advisable to clean your 3D printer nozzle after every 10 hours of printing. However, the frequency may increase if you use materials prone to causing clogs or if you observe a decline in print quality.
Why is my 3D printer nozzle jamming?
Your 3D printer nozzle may jam due to incorrect temperature settings, a worn-out nozzle, or the use of improper filament material. Replacing or upgrading the nozzle and using the recommended filament and settings can alleviate jamming issues.
by admin | May 10, 2017 | Blog
ICER: a 2m² 3D printed patron St. George
3D printing allows the creation of unique designs. As you may have seen before in the video Eric Huls [DUTCH] of Innovation Center ICER started a remarkable project: printing a two square meter model of patron St. George. After successfully printing a smaller prototype, now the real work begins…

Challenges
Eric is now building part for part a patron of St. George that is entirely 3D printed. Many aspects come into play: building volume, strength, finishing and weather conditions. All this needs to be taken into account during the building process. Building a 2m² that is fully 3D printed required re-approaching the design process entirely. You need to conceptualise what the final model will look like and take the 3D printed properties into account when designing the different parts.
According to Eric the project is one big challenge: “I came across several issues and I decided how to solve them on the spot. For instance, I underestimated the required time and the finishing touch. During the project I have learned that I have to slice the parts in a different way. Another challenge you need to take into account is the size of the project; I have never printed such large models with ABS and this requires a different approach than printing smaller models. You have to take the dimensions into account, so that each part fits perfectly and it becomes a whole. It is a matter of experience; you learn along the way”.
Large prints and no filament wasting
Because the prints are so big, the Filament Management Module is a big help. Each part takes about 80 till 111 hours and requires a lot of material: “You don’t want to take the risk destroying your print because of out-of-filament. Thanks to the module the 3D printer automatically switches to the second roll and it continues printing. Also, you have no more filament wasting and you can re-use and finish your filament rolls completely”, says Eric.

Current state
So far, Eric has been working on the project for about 600/700 hours. Currently he is working on the wing for the dragon. After securing the wing to the torso of the dragon, Eric will continue with the bottom part of the dragon: “I work from bottom to top”. Eric uses acetone to secure the parts. The big advantage is that there are no glue residues. Also, the gaps are filled with acetone to make the model resistant against weather influences. After securing the entire model, Eric will plaster, polish and prime the entire 3D model for a beautiful finish.
Support
Eric bought 4 dddrop 3D printers for realizing this project: “I am still very satisfied with the dddrop 3D printers. In case of any issues I receive great support from dddrop and CAD2M. They come up with solutions and give me tips to obtain the best results”.
Eric hopes the project will be finished the second week of July. This way it is finished before the local fairground and everyone can get a glance of patron St. George.
by admin | Apr 21, 2017 | User Story
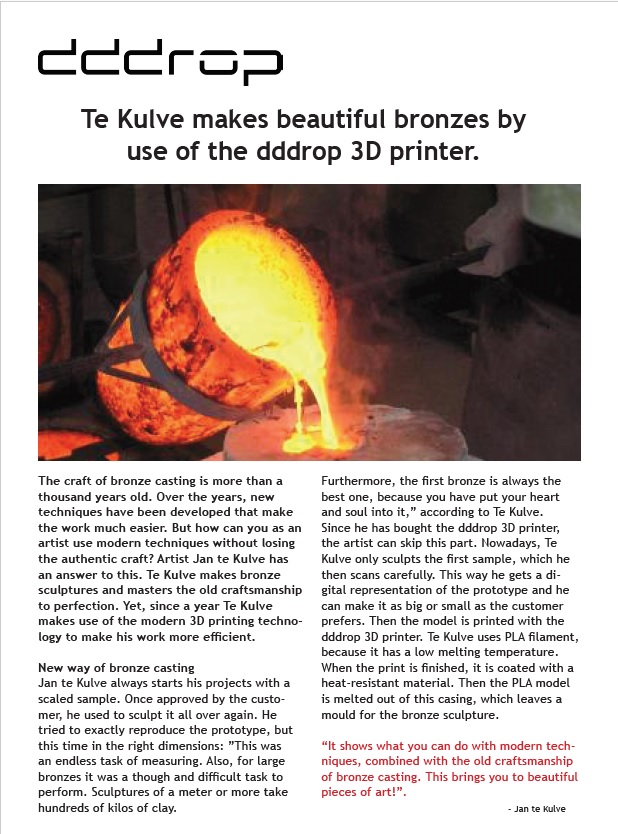
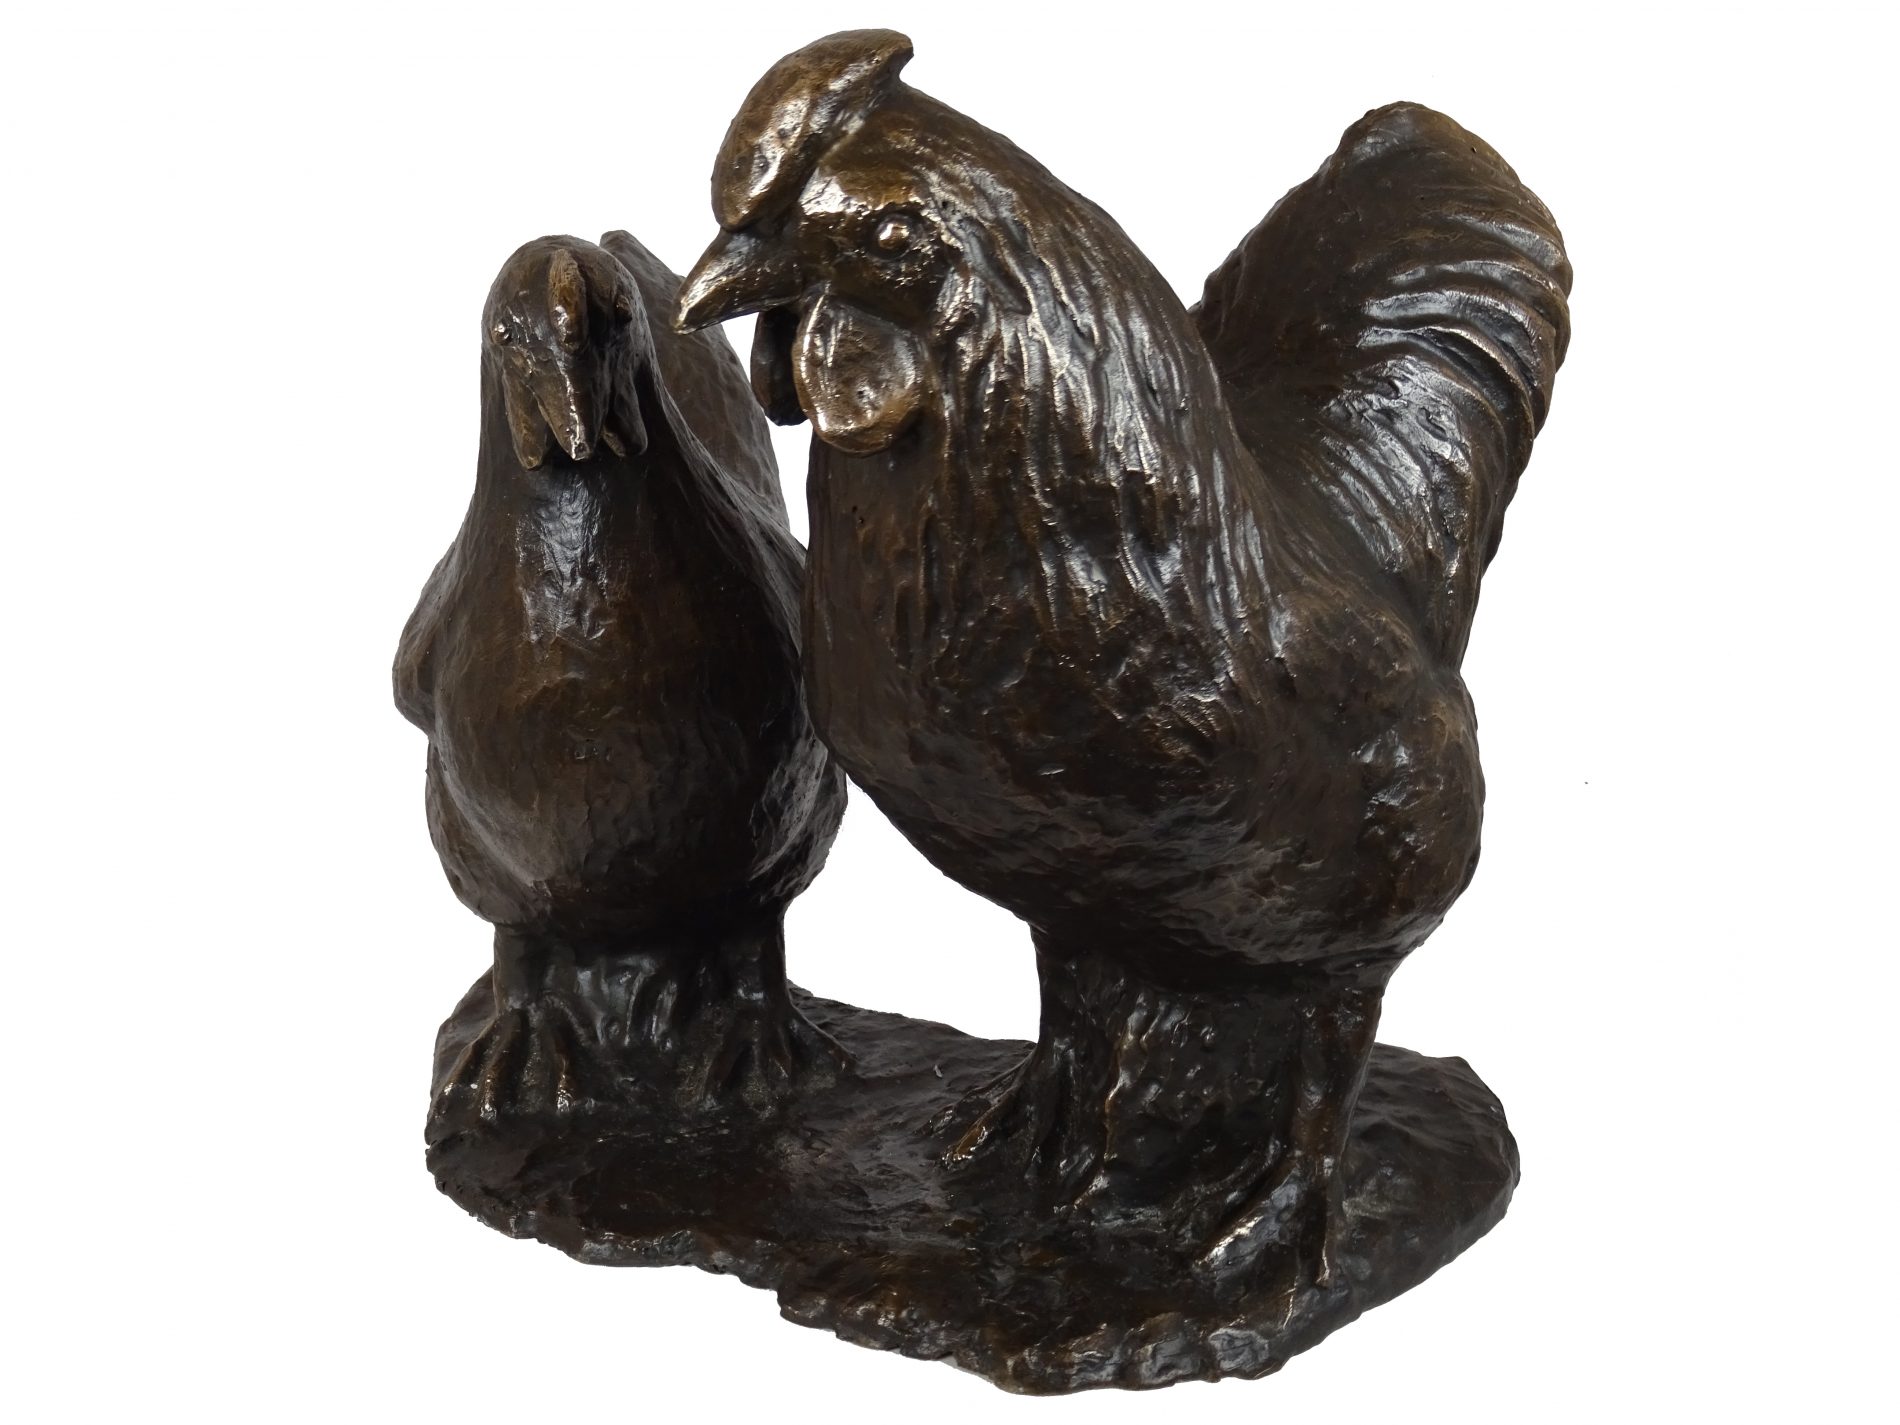
Te Kulve makes beautiful bronzes by use of the dddrop 3D printer!
The craft of bronze casting is more than a thousand years old. Over the years, new techniques have been developed that make the work much easier. But how can you as an artist use modern techniques without losing the authentic craft? Artist Jan te Kulve has an answer to this. Te Kulve makes bronze sculptures and masters the old craftsmanship to perfection. Yet, since a year Te Kulve makes use of the modern 3D printing technology to make his work more efficient.
“Thanks to the dddrop 3D printer, I can deliver truly customized work and meet the demands of the market much better”.
In the decision process of buying a 3D printer, Te Kulve took the circumstances of his studio into account. He has to deal with a dusty and often a cold environment. That’s why he found it important to buy a 3D printer with a closed casing, so the dust stays outside and the heat remains inside. He made a deliberate choice for the dddrop 3D printer: “The closed casing and the large building volume were important factors, but I mainly oriented myself in the field. I have seen many different 3D printers at work. Quite a lot of printers didn’t meet my expectations and the dddrop did, so that’s why I bought the dddrop,” Te Kulve says.